Clone Any App Screen — and Prove It: Introducing super-prototyping
By OPC Team | September 14, 2026 | 8 min read
TL;DR — We shipped super-prototyping, an agent plugin that rebuilds product UI as self-contained HTML artboards on a local tldraw canvas. Hand your agent screenshots, ask for the clone-prototype skill, and it grids the capture, samples it region by region, writes one measured token block, generates every board from a single gen.py, then re-renders and diffs those boards against the capture until the numbers hold. Every colour and every metric traces back to a measurement. It is Apache-2.0, works in Claude Code, Codex, CodeBuddy, Hermes, Pi and anything that reads SKILL.md, and it is now featured on opc.dev.
The Problem: "Looks About Right" Is Not a Replica
Ask any AI agent to rebuild a screen from a screenshot and you get something that is approximately the app. The blue is a blue. The row height is a row height. The font is "a clean sans-serif."
Individually each value is off by two or three points. Together they read as a knock-off, and nobody can tell you which value is wrong, because no value was ever measured. It was inferred from a thumbnail the model glanced at.
That is the failure mode super-prototyping is built against. The rule the whole plugin is organised around:
Every colour and every metric in a cloned artboard traces to a measurement.
Grid the reference image. Look at it. Name the element. Then write the token. No evidence, no token.
What is super-prototyping?
It is an agent plugin: three skills, a measuring toolkit, and a local canvas app that shows the boards.
| Skill | Use it for |
|---|---|
| clone-prototype | Copying a real app's screens from captures, by measurement |
| new-ui-mock | Designing new screens with no reference, built on existing tokens — including the empty, loading and error states |
| prototype-canvas | Running and operating the canvas: boards, layout.json, deep links, annotated-screenshot review |
The output is plain files. Each board is one .html file in mockups/canvases/<board>/, fully self-contained — no external CSS, JS, fonts or images, data: URIs and inline SVG only, because boards render inside <iframe srcDoc sandbox="">. The canvas picks them up as shapes with no registry, no build step and no design tool.
Your project holds boards and nothing else. The plugin upgrades around them.
How a Clone Actually Runs
clone-prototype is phased, and the phases do not reorder. Sampling before tokens, tokens before HTML.
Phase 0 — Collect references, and one number
Every capture is saved to a scratch directory first, because image caches rotate mid-task. Then the capture scale gets recorded once, in pixels per design point, and cross-checked against height:
300 / 393 = 0.7634 px/pt
That number decides what is measurable. A 0.76 px/pt strip cannot settle a 1pt divider, so the skill goes and gets one native @3x capture of any screen in the same app before it trusts thin ink.
Phase 1a — Grid, then look
refkit grid p4.png -o g04.png --zoom 3 --minor 10 --major 50
This draws a labelled grid onto the pixels — cyan every 10pt, red every 50. The agent then reads that image as an image and names the element each region belongs to before measuring anything.
This ordering is the point. Coordinates picked blind produce numbers with no element attached, and those are exactly the numbers that land in the wrong token.
Phase 1b — Sample, region by region
refkit sample p4.png 76 646 132 668 --pt 3
A census over one named region. Which line of the census you believe depends on what you pointed at:
- page, card, sheet → flat fills. A pixel equal to all four neighbours is a real fill, not an antialiased edge
- badge, dot, brand mark → all pixels, top entry, on a core-only crop — too small to have a flat interior
- text → the ink core, the darkest few percent. The mode of a text region is its background, not its ink
- pitch, edges, radii →
bands/bbox/scan - 1pt divider or border →
refkit hairline, which solves from the ink deficit, because a hairline never reaches full coverage in a downscaled capture
Out of this comes a token table with an evidence column.
Phase 1c — Name the face
refkit font ref.png 17.3 139 78.7 152 Libraries --pt 3 --fonts brand/
It renders that one word in every candidate face and ranks the glyph shapes at a common cap height. A closed set of ~20 faces on disk is the right problem to solve: published classifiers answer a 3,000-class Google-Fonts question and so structurally cannot name SF Pro. Under a 0.05 top-two margin it reports no call rather than naming a lookalike.
Phase 2 — One design system
One :root block: the measured font stack, the colour ramp, radii per component class, composite font: shorthands, geometry constants. It is built as the first artboard, because it is the contract every later screen is checked against.
Phase 3 — One generator
A single gen.py emits every screen, inlining that :root byte-identically.
Artboards are output, never source. Hand-edit one and the next run reverts it.
Artwork already present in the capture is cropped out of the capture at its own measured box, keyed by id in a crops.json the generator reads — so an asset cannot drift from where it was measured, and a box correction is one edit rather than two. A crop is the reference's own pixels, so it scores Δ 0 by construction. Only what no capture contains gets generated.
Phase 4 — Verify by rendering
shoot --crop-phone --check-overflow
diff --regions
tokens
Render, de-frame, put your fill next to the reference's, audit the :root. The output is a Δ per region, in numbers.
The loop is 1a → 4 → 1a. A diff that disagrees sends you back to the grid, not to the CSS. A correction you have not re-rendered is not a correction.
Phase 5 — Park the reference
Each source capture becomes its own ref-NN-*.html board and is listed as a third layout.json row in the same order as the replicas. Rows lay out at index × (w + gap), so item N lands under item N.
The result: every replica sits directly above its source capture, cropped to the same 393 × 852 screen and masked to the same 52pt corner radius. The two are one glance apart rather than one memory apart.
The Canvas
sp-canvas start
It finds the bundled canvas app, installs its dependencies on first run, boots on 127.0.0.1:5173 against ./mockups/canvases, and prints the address. sp-canvas status and sp-canvas stop do what they say.
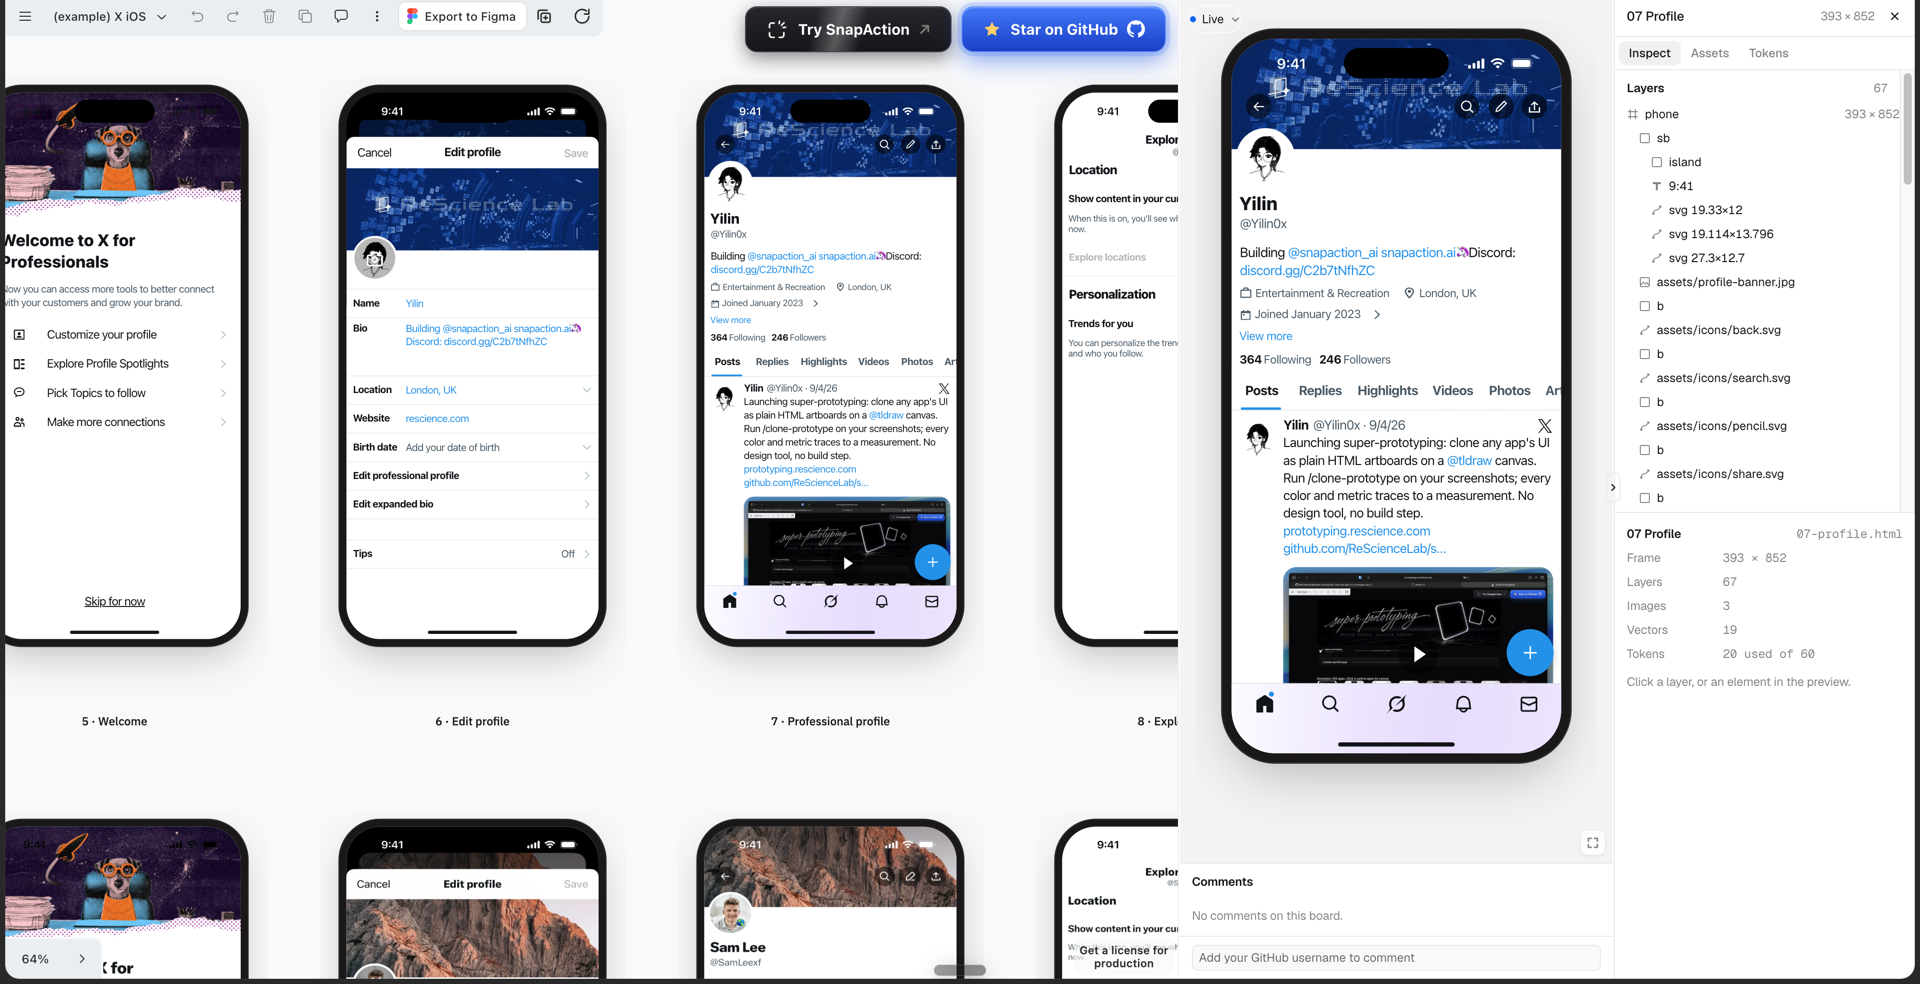
An x-ios clone on the canvas. Boards sit on the grid at left; clicking one opens it in the inspector at right — live at its real 393 × 852 pt, with its layer tree, its assets, and the count of design tokens it actually uses (20 of 60). Nothing here is a picture of a screen: each board is the HTML, rendering.
Deep-link a page with ?canvas=<slug>, and one board of it with ?canvas=<slug>#<file> — it opens in the inspector with the camera on it, and clicking any board writes that link into the address bar. The URL in the bar is always the link to share. A board folder added after boot appears on its own.
Every board is clipped to a 478 × 980 shape box. The iPhone frame is 393 × 852 pt at 1pt = 1px, with a 54px status bar, a 125 × 36 Dynamic Island and a 139 × 5 home indicator.
Fourteen Worked Examples, Not a Demo Video
The repo ships fourteen app folders in mockups/canvases/, each a real clone-prototype run with the evidence recorded for every token. Five are walked through in the README:
duolingo-ios— eight screens of the learning path plus two modal sheets, mostly pictureluma-ios— twelve screens, including the case where the replica draws a Dynamic Island the capture does not havenotion-ios— eighteen screens from @3x capturesclaude-ios— fifteen screens across four flowsraycast-ios— eleven screens across three flows
Copy any of them as a starting point: sp-canvas root prints wherever the plugin landed.
Installation
It installs in two halves. The plugin holds the three skills and the canvas app. The toolkit the skills call by name is one more command, once per machine.
Claude Code
/plugin marketplace add ReScienceLab/super-prototyping
/plugin install super-prototyping@super-prototyping
Other agents
| Your agent | Install the plugin |
|---|---|
| Codex | codex plugin marketplace add ReScienceLab/super-prototyping then codex plugin add super-prototyping@super-prototyping |
| WorkBuddy / CodeBuddy | codebuddy plugin marketplace add ReScienceLab/super-prototyping then codebuddy plugin install super-prototyping --scope user |
| Hermes | hermes plugins install ReScienceLab/super-prototyping --enable |
| Pi | pi install git:github.com/ReScienceLab/super-prototyping@super-prototyping--v<version> |
Trae, and anything else that reads SKILL.md |
npx skills add ReScienceLab/super-prototyping |
Then the toolkit, from any of them
uv tool install "git+https://github.com/ReScienceLab/super-prototyping#subdirectory=tools"
One skills tree, a thin manifest per product, so a skill is never forked to be ported. Both halves carry the same version, and sp-canvas start prints the line to run when they drift apart.
A smaller install. The full one is about 151 MB, because the repo is also the workspace holding those fourteen example boards. Declare the marketplace in ~/.claude/settings.json with sparsePaths for .claude-plugin, skills, canvas, tools and mockups/canvases/templates, and Claude Code clones just those directories — 6.7 MB installed, against 151 MB.
Why This Sits Next to OPC Skills
OPC Skills is about a one-person company doing the work of a team. The gap that keeps showing up is design: you can ship the backend, the deploy and the landing copy alone, and still have no way to see the product before building it.
super-prototyping closes that gap without adding a design tool to the stack. The boards are HTML you already know how to read, they live in your repo, they diff in git, and the agent that builds them is the agent already in your terminal.
It is a separate repo with its own release cadence, its own homepage at prototyping.rescience.com and an Apache-2.0 licence — so it is featured on opc.dev rather than folded into the skills library.
FAQ
Do I need Figma or any design tool?
No. Boards are .html files the canvas reads straight from a directory. No registry, no build step, no design tool.
Is this just "screenshot to code"?
No — that is the thing it is built against. Screenshot-to-code infers values. clone-prototype measures them, records the evidence per token, then re-renders and diffs the result against the capture until the numbers agree.
Does it only do iOS?
The iPhone frame is a built-in spec (393 × 852 pt), but a board is arbitrary self-contained HTML inside a 478 × 980 shape box. Web and desktop screens work the same way.
Can I design screens that don't exist yet?
That is new-ui-mock: new screens built on the same measured token block, including the empty, loading and error states, and side-by-side proposals.
Getting Started
- Install the plugin for your agent, then the toolkit with
uv tool install - Start a project: copy
mockups/canvases/templatesintomockups/canvases/<slug>and run itsgen.py - Run the canvas:
sp-canvas start - Hand your agent screenshots and ask for the
clone-prototypeskill
Further Reading
- super-prototyping on GitHub — source, the three skills, and all fourteen worked examples
- prototyping.rescience.com — project homepage
- OPC Skills Library — browse all 10 skills
- Why Skills Beat Documentation — the case for skills over static docs
- What is OPC? — the One Person Company movement